Showing posts with label CertificationAuthority. Show all posts

Thursday, March 22, 2018


[NPS(RADIUS)] Event id 18 'Message-Authenticator attribute that is not valid.'


Event id 18 'Message-Authenticator attribute that is not valid.'


Log Name:      System
Source:        NPS
Date:          3/9/2018 1:48:55 PM
Event ID:      18
Task Category: None
Level:         Error
Keywords:      Classic
User:          N/A
Computer:      NPS_Server
Description:
An Access-Request message was received from RADIUS client 0.0.0.0(RADIUS_Client) with a Message-Authenticator attribute that is not valid.


[Explanation]

Windows NPS (Network Policy Server) 서버에서 Cisco Meraki Controller를 사용해서 PEAP인증으로 사용하려고 하였으나, 상기 이벤트처럼 메시지가 발생하며, 인증 처리가 되지 않은 증상이 발생하고 있었습니다. 

SSK(Shared Security Key)가 일치한 지 확인을 하였지만 동일하게 발생하여, 알아보던 중 문제는 전혀 다른 곳에서 확인 할 수 있었습니다. 바로 로컬PC의 무선랜 설정과 관련된 부분입니다. 

우선 무선 인증을 요청하기 위해서 아래와 같은 순서로 무선 네트워크를 설정하게 됩니다. 아래 그림처럼 순서대로 진행하시면 됩니다. 중요한 것은 아래 별도로 설명드리겠습니다. 


여기까지 진행하시면 이제 생성된 무선 네트워크에 대한 속성 정보가 보이게 됩니다 여기서 '보안' 탭에서 '네트워크 인증방벙 선택' 옆에 있는 '설정'을 클릭합니다. 그러면 우측 '보호된 EAP 속성'이 보이는 여기서 연결할 때 '인증서를 확인하여 서버의 ID 확인'을 해제 합니다.

해제하는 이유는 이 부분이 적용되면, PEAP인증을 수행하더라고 Local PC에 저장된 사용자 혹은 컴퓨터 인증서를 확인한다는 의미로, PEAP를 사용하지만 TLS 방식도 참고하는 것이기 때문입니다. 상기 메시지는 바로 이 부분 때문에 발생한 것 입니다.


나아가 추가로 설정하면 좋은 정보를 공유드리면 '보호된 EAP 속성' 화면에서 인증 방법 선택 옆에 있는 '구성'을 누르시고 EAP MSCHAPv2 속성을 해제합니다. 이 의미는 로그온 한 계정 정보를 기반으로 PEAP 인증을 시도한다는 부분인데, 도메인 환경이 아닌 PC 경우는 인증 처리가 되지 않습니다. 


또한 무선테트워크 속성의 '보안'탭에서 '고급설정'으로 가셔서 '인증 모드 지정' 항목이 있는데, 여기서는 컴퓨터 인증이 아닌, '사용자 인증'으로 지정하셔야 합니다. 그래야 NPS와 연동하는 AD 계정 혹은 별도로 지정한 계정으로 로그온이 가능합니다. 


♔♔♔♔♔♔♔♔♔♔

댓글이나 의견은 언제든지 환영합니다.

Your Comments are Always Welcomed!
Share:

Thursday, October 12, 2017


[CertificationAuthority] Windows CA Signing 작업 수행하기(Event 17 Troubleshooting)


Windows CA Signing 작업 수행하기(Event 17)


Log Name:      Application
Source:        Microsoft-Windows-NetworkDeviceEnrollmentService
Date:          2017-10-11 오후 3:30:52
Event ID:      17
Task Category: None
Level:         Error
Keywords:    
User:          Domain\NdesService
Computer:      CA_Server
Description:
The Network Device Enrollment Service cannot retrieve required information, such as the transaction ID, message type, or signing certificate, from the client's PKCS7 message (0x80090006).  Invalid Signature.
Event Xml:
<Event xmlns="http://schemas.microsoft.com/win/2004/08/events/event">
  <System>
    <Provider Name="Microsoft-Windows-NetworkDeviceEnrollmentService" Guid="{73144342-19D1-47A4-94DE-D38E6A054AD5}" />
    <EventID>17</EventID>
    <Version>0</Version>
    <Level>2</Level>
    <Task>0</Task>
    <Opcode>0</Opcode>
    <Keywords>0x8000000000000000</Keywords>
    <TimeCreated SystemTime="2017-10-11T06:30:52.689000700Z" />
    <EventRecordID>1772924</EventRecordID>
    <Correlation />
    <Execution ProcessID="15136" ThreadID="10532" />
    <Channel>Application</Channel>
    <Computer>CA_Server</Computer>
    <Security UserID="S-1-5-21-3168535572-3829850731-2228477670-1641" />
  </System>
  <EventData Name="EVENT_MSCEP_FAIL_TO_RETRIEVE_INFO">
    <Data Name="ErrorCode">0x80090006</Data>
    <Data Name="ErrorMessage">Invalid Signature.</Data>
  </EventData>
</Event>


[Explanation]

Cisco ISE를 통해서 인증 처리를 수행하는 고객사가 있었는데, ISE 자체 인증서가 만료되어 해당 인증서를 갱신하였다. 하지만 상기 이벤트 메시지처럼 갱신한 이인증서가 기존 인증기관(CA)에 인증을 거치지 않았기 때문에(Signing) 에러 이벤트가 발생하였다. 그래서 아래와 같이 ISE의 pem에 대해 Signing하는 방법에 대해 공유하고자 한다. 

1. In your web browser address bar, type the IP address of the server where the Certification Authority is installed, followed by certsrv.
For example: https://CA Server address/certsrv

2. Click the Request a Certificate link.

3. Click the Advanced certificate request link.

4. Click Submit a certificate.

5. Paste the contents of your CSR file into the Saved Request text box.


6. For content inspection certificates for outbound traffic, from the Certificate Template drop-down list, select Subordinate Certification Authority. 
7. Click Submit.

8. Select proper encoded type and download certificate


참고 페이지는 이곳입니다.

♔♔♔♔♔♔♔♔♔♔


댓글이나 의견은 언제든지 환영합니다.

Your Comments are Always Welcome!
Share:

Tuesday, August 29, 2017


[CertificationAuthority]NPS 서버에서 CRL 유효성 check하지 않도록 설정


NPS 서버에서 CRL Check Disable 관련 설정


[Explanation]

무선컨트롤러를 통해서 NPS 서버에서 접속하는 서버 및 Client에 대해 접속시도하는 Device에 내장된 인증서 정보(CRL포함)하여 NPS서버에서 확인합니다. 

하지만 NPS서버의 인증서가 자체가 만료되어 NPS로서의 기능을 제대로 수행하지 못하게 될 때 정상적인 상태의 device도 거부시키게 됩니다. (실제 장애 발생) 보통은 그런 경우는 Domain 환경에서는 인증서를 자동으로 갱신되도록 정책으로 설정을 수행합니다. 

참고로 인증서를 자동으로 갱신되도록 정책으로 설정하는 방법은 아래 경로에서 설정 및 Enable 하면 됩니다. 


  • Computer Configuration >Policies>Windows Settings >Security Settingsshow >Public Key Policies/Certificate Services Client - Auto-Enrollment Settings >'Automatic certificate management' 항목 Enable 
  • 1) 'Enroll new certificates, renew expired certificates, process pending certificate requests and remove revoked certificates' 항목 Enable
  • 2)  'Update and manage certificates that use certificate templates from Active Directory' 항목 Enable


다시 본론으로 돌아와서 자동으로 인증서 발급을 받지 못한 경우 인증 실패가 발생하게 되는데 이를 위해서 NPS서버가 CRL Check를 중단하기도 한다. 그 경우 아래와 같이 레지스트리 값을 설정하면 됩니다. 
Key: HKLM\SYSTEM\CurrentControlSet\Services\RasMan\PPP\EAP\13
Value: NoRevocationCheck
Type: REG_DWORD
Data: 1

댓글이나 의견은 언제든지 환영합니다.

Your Comments are Always Welcome!
Share:

Wednesday, August 23, 2017


[CertificationAuthority] CA 만료 기간 관리 스크립트(Powershell)


CA 만료 기간 관리 스크립트(Powershell)


[Explanation]

도메인 환경이든, 아니던, 서버를 운영하다보면 평소에 간과하는 부분이 CA 관련 설정입니다. CA는 보통 자동으로 갱신되도록 GPO 정책으로 설정이 되어 있지만 일부 설정이 안되어 있는 경우, 서버 자체의 기능을 수행하지 못하는 문제가 발생할 수 있으므로 반드시 관리가 필요합니다. 관리를 하기 스크립트를 trigger 할 수 있는 bat 파일을 별도로 생성하여 작업스케쥴 혹은 메일링을 수신 받도록 한다면 좋을듯 합니다. (메일링 관련해서는 추후 포스팅하도록 하겠습니다. )

하기 스크립트는 우선 컴퓨터 계정 대상 발급한 인증서를 조회하는 스크립트이며, 1을 수행하고 나서 Get-Childitem을 통해서 경로를 변경하셔서 원하는 정보를 조회하시면 됩니다. 그리고 인증 만료 기간을 설정할 수 있는데요,(하기 99999일로 설정된 정보) 원하시는 알림기간을 설정하시면 만료되기 xxxx일 전인 인증서만을 조회할 수 있습니다. 
  1. Set-Location cert:\LocalMachine
  2. GET-CHILDITEM -RECURSE | where {$_.PSParentPath -like '*localmachine\My*'  -AND $_.notafter -le (get-date).AddDays(99999) -AND $_.notafter -gt (get-date) }  | Ft subject, notafter  

참고로 인증서 관련 Cmdlet은 원격 저장이 지원되지 않는다. 예를 들어서, 아래와 같이 인증서 관련 정보를 추출한 후에 별도로 네트워크 공유로 저장하려고 하면 메시지가 발생한다. 링크참고

PS cert:\LocalMachine> GET-CHILDITEM -RECURSE | where {$_.PSParentPath -like '*localmachine\My*'  -AND $_.notafter -le (get-date).AddDays(99999) -AND $_.notafter -gt (get-date) }  | select subject, notafter |  export-csv -path \\Server\certmon\et.csv -NoTypeInformation
Export-Csv : Cannot open file because the current provider (Microsoft.PowerShell.Security\Certificate) cannot open a file.
At line:1 char:198
+ GET-CHILDITEM -RECURSE | where {$_.PSParentPath -like '*localmachine\My*'  -AND $_.notafter -le (get-date).AddDays(99999) -AND $_.notafter -gt (get-date) }  | select subject, notafter |  export-csv <<<<  -path \\Server\certmon\et.
csv -NoTypeInformation
    + CategoryInfo          : InvalidArgument: (:) [Export-Csv], PSInvalidOperationException
    + FullyQualifiedErrorId : ReadWriteFileNotFileSystemProvider,Microsoft.PowerShell.Commands.ExportCsvCommand

♔♔♔♔♔♔♔♔♔♔

댓글이나 의견은 언제든지 환영합니다.

Your Comments are Always Welcome!
Share:

Monday, July 24, 2017


[Certification Authority] Event ID 36882에 대한 조치법


CA 관련 Event ID 36882에 대한 조치법

신뢰할 수 없는 인증서에 대한 Schannel provide 이벤트


 Log Name: System
 Source: Schannel
 Task Category: None
 Event ID: 36882
 Level: Error
 Description: The certificate received from the remote server was issued by an untrusted certificate authority. Because of this, none of the data contained in the certificate can be validated. The SSL connection request has failed. The attached data contains the server certificate.
 Keywords:  User: NETWORK SERVICE


[Explanation]
AD 인증기관(certification authorities)는 인증 요청한 대상과 인증이 발행한 대상을 확인해서 상호 신뢰할 수 있도록 하는 제3자의 역할을 수행한다. AD 인증기관는 인증 요청 대상의 정보가 Public key로 보내진 정보에 대해 (필요에 따라) 인증서를 갱신하거나 만료처리한다. 
예를 들어, Client가 서버용 인증서를 발급 받게 되면, Client의 컴퓨터는 해당 인증서가 신뢰할 수 있는 AD 인증기관를 통해서 발급 받은 것인지 확인한다. 발행한 인증기관가 신뢰된다면, Client는 해당 인증서가 진짜로 발급될 수 있는지 확인할 것이다.  

♔♔♔♔♔♔♔♔♔♔

[Cause]

Schannel provide는 로컬 컴퓨터에 있는 신뢰할 수 있는 root CA 주체를 검색해서 신뢰할 수 있는 인증기관(certification authorities) 목록을 만들어 낸다. Schannel provide가 신뢰할 수 없는 인증기관로 부터 발급된 인증서가 확인될 때 이 이벤트 로그가 발생하게 된다. 

 ♔♔♔♔♔♔♔♔♔♔

[Resolution]

따라서 기존에 발급 받은 인증서를 삭제하고 다시 import를 하고 모니터링 하면 된다. 


댓글이나 의견은 언제든지 환영합니다.

Your Comments are Always Welcome!
Share:

Wednesday, June 21, 2017


[CertificationAuthority] Network Device Enrollment Service 관련 Event ID 3, 77, 5059, 5021


Network Device Enrollment Service와 Certification Authority 그리고 WAS 관련 이벤트가 어느 날 갑자기 엄청나게 보이기 시작하였다...

Network Device Enrollment Service가 멈추고...(Event ID 3)


Certification Authority 관련 이벤트가 발생하기 시작하고...(Event ID 77)


IIS에 올려져있는 Application Pool인 SCEP에서도 실패 메시지가 발생하기 시작하였다. (Event ID 5059)


그리고 그에 대해 보다 세부적인 이유를 알 듯 말듯한 보편타당스러운 이벤트 메시지까지..(Event ID 5021)


관련 메시지를 구글링을 해보니, 원인은 정말 간단하였다. 특정 인증서 템플릿을 발급할 당시 Active Directory의 특정 계정을 사용하여 발급을 해서 (여기까진 Certification Authority) 그 계정으로 IIS 서비스(Application pool의 SCEP)를 통해 Network Device Enrollment Service 통해서 단말기(기기)에 대한 인증을 받는 과정이다. 

하지만 어이없게도 그 특정계정이 Active Directory에서 서비스 계정임에도 불구하고 계정에 대한 정책에서 "Password Never Expires" 체크가 해제되어서 Domain 정책(90일 이후 Password 변경)으로 인해 문제가 발생한 것이다. 


그래서 비밀번호 초기화 하고 아래와 같이 "Password Never Expires" 체크를 해주고 해결!


Share:

Wednesday, February 1, 2017


[CertificationAuthority] 사용자 및 컴퓨터 인증서(CA) 발급 확인 방법


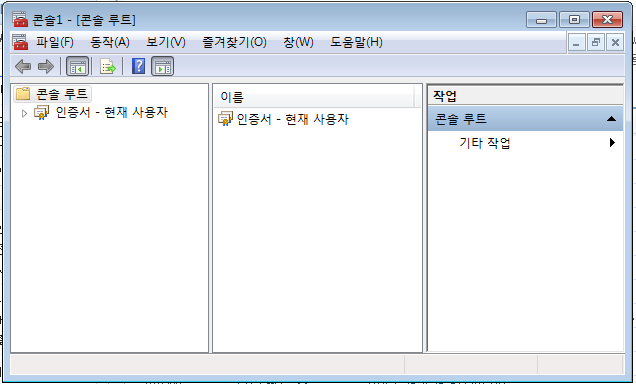
[Start]->[Run..]을 클릭, 실행할 프로그램명으로 “MMC”를 입력한 후 [OK]를 클릭하여 MMC 콘솔을 실행한다.

표시된 MMC 콘솔화면에서 [File]->[Add/Remove Snap-In] 메뉴 선택하여 아래와 MMC 스냅인를 추가할 수 있는 “Add/Remove Snap-In”화면을 표시한 후 [Add] 버튼을 클릭한다. 


  “Add Standalone Snap-in”화면에서 추가할 스냅인으로 “Certificates(인증서)”를 선택하고 [Add] 버튼을 클릭한다. (아래 그림 참조)


  “Certificates – Current User”스냅인의 “Personal”폴더을 아래와 같이 확장한 후 사용자에게 발급된 인증서가 있는지 확인한다


상기 tree를 확장해보면 아래와 같이 대상에 따른 인증서를 확인할 수 있다. 


#ActiveDirectory #CA #Certificates #mmc ##snapin


Share: